Last week, new release-candidate versions of Camera Raw and Lightroom were posted to Adobe Labs that feature additional camera and lens support. I was extremely excited when I found out that one of the new camera profiles supported is the GoPro Hero 3. I’m a huge fan of GoPro cameras, and this means we now have more ways to get more creative with their usage.

I have a GoPro Hero 3 Black, and I use it in lots of different situations… everything from mounting it to a surfboard, attaching it to a remote control helicopter, mounting it on my car, to weird perspectives snapshots of everyday life. I love the camera, and am always finding new/creative ways to use it.
I was recently thinking… I absolutely love the shots I get off of the GoPro, but I wish there was an easy way to reduce the fisheye distortion. I wanted to try my hand at creating some aerial panoramas, but the distortion was causing issues. You can reduce the distortion using Photoshop’s Adaptive Wide Angle filter, but that can be tedious to get right. This release makes the process of reducing fisheye dead simple.
Reducing the lens distortion is now as simple as selecting the GoPro camera profile in Camera Raw’s lens correction settings, and you can use it to create some incredible images. Check out the video below to see how to apply GoPro lens correction to both images and videos in Adobe Photoshop, Adobe Lightroom, and Adobe Bridge.
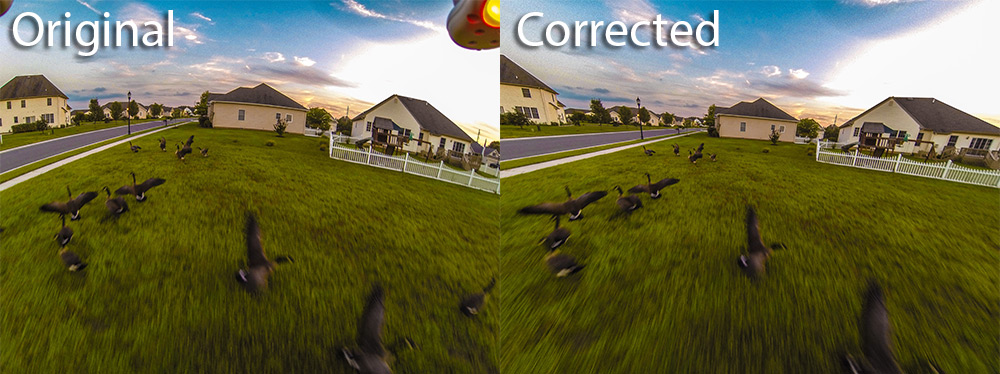
Images
Here are some side-by-side comparisons of before and after applying the GoPro lens correction.

Panoramas
I’ve also been able to use this feature to create some awesome (in my opinion) aerial panoramas using the DJI Phantom quad-rotor remote controlled helicopter. The easiest way to create one of these panoramas is to select the images you want to merge inside of Adobe Bridge. Then right-click and select “Open in Camera Raw…”, and then apply the lens correction to all of the images. Once you’ve done that, keep the same images selected and go to Tools -> Photoshop -> Photomerge inside of Adobe Bridge. This will launch the Photomerge process inside Photoshop, and after a few minutes, you will have a nice panorama to work with. Take the generated panorama, turn it into a smart object, and then you can start applying other filters (including Camera Raw) to it, and you can achieve some great results.
Here are a few panoramas I’ve created. Click on any one of them to view an interactive panorama, where you can zoom into the full resolution of the image.


To make the panoramas interactive, I used Photoshop’s “Zoomify” export, combined with the Leaflet mapping library for an interactive HTML experience. You can ignore the HTML it generates, but keep the images and XML configuration file. I then used this open source Zoomify Layer for Leaflet to make the images fully interactive, without any plugin dependencies. You can pinch/zoom and pan the images, and they are loaded as individual tiles, so it’s a smooth experience for the end user.
Next Steps
Go get started, and have fun! You can download Camera Raw 8.2 and Lightroom 5.2 release candidates from labs.adobe.com - just make sure to get the correct Camera Raw plugin for your suite (CS6 or CC).
Also, check out this video produced by Adobe’s own Russell Brown for additional information:
Have fun and enjoy! Feel free to share any of your creations too!