Here’s a fun tutorial for one of the last Friday afternoons of 2013… the creation of 360 degree panoramas, or “planets” as some like to call them. If you’re not quite sure what I’m talking about, check out the image below:
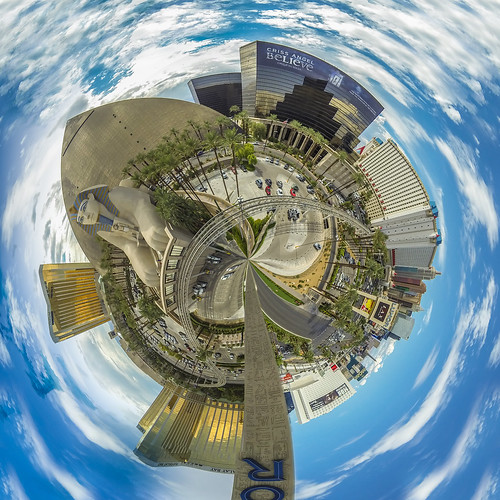
A panorama is a wide-angle view, usually captured with either a special lens, or by stitching together multiple images to create the wide angle view. A 360 degree panorama is a representation of the wide angle view into a sphere.
This image was created in Photoshop by taking multiple images which were captured by GoPro attached to a remote controlled helicopter, stitching them together to create a wide angle panorama, then creating a 360 panorama from the wide angle panorama.
Check out the video below to see a timelapse for the creation of this image. Details below…
Pretty cool, right? I had a great time putting this together. Just ask any of my friends, and they will tell you that I have been completely obsessed with this. It’s not a new technique - This has been around for years, but it’s one not everyone knows off of the top of their head. You should know how to do it too!
Here’s how you go about creating a 360 degree spherical panorama:
Step 1: Start with the image
You don’t have to have a massive panorama. You can use any image that you want. Though, I’ve had the best results by applying this to panoramas. You could also crop an image to be much wider than it is tall. If you want to learn how to create panoramas, check out these tutorials:
- Creating Aerial Panoramas from GoPro Hero 3 Images by Russell Brown
- Creating Panoramic Images With Photomere
- My previous post: Create Amazing Panoramas in 10 Easy Steps

I did a manual process that is a variation of these… The original images I had were from a GoPro Hero 3 camera. I applied lens profile correction in Lightroom, then loaded the images into Photoshop as separate layers of the same PSD composition. Then I used auto-align layers and auto-blend layers to merge the images into a single panorama.
Step 2: Straighten the image (if needed)
Next, make sure that the image is straight. It’s best to have a level horizon, without significant curvature. You can straighten the horizon/lens distortion using Adaptive Wide Angle in Photoshop. Check out this video tutorial also from Russell Brown to learn more about Adaptive Wide Angle in Photoshop.

Step 3: Rotate and Crop
You’ll want to rotate and crop the image so that the horizon is level, and you get rid of missing areas within the image. If you’re missing part of the image, but you don’t want to crop any more, you can use content aware fill or the clone stamp to synthesize the missing parts.

Step 4: Get Rid of Seams
You don’t necessarily need a full view of 360 degrees to create these types of images, but you will get the best results if the image doesn’t have any glaring seams. The way that I usually go about doing this is by splitting the image in half, and swapping the two sides so that the seam is in the middle of the image, with some overlap.

Then I use Photoshop’s clone stamp, brushes, or content aware fill to get rid of any glaring visual seams so that it is one complete image. You’ll probably need to crop this again to get rid of any whitespace introduced from the overlapping.
Step 5: Make the image a square
Just go to Image->Image Size and make the width and the height of the image the exact same value (you’ll need to unlink width and height). This will stretch your image out vertically - don’t worry, the stretching is OK and is part of the process.

Step 6: Flip the image
Next, you’ll want flip the image so that it is upside down. You can do this either by going to Edit->Transform->Rotate 180, or Edit->Transform->Flip Vertical.

Step 7: Apply Polar Coordinates Distortion
Make sure that your image has been flattened or that all layers are within a smart object, so you are applying this filter to only one layer. Select the target layer, then go to Filter->Distort->Polar Coordinates. Make sure that the “Rectangular to Polar” option is selected, and hit “OK”.

When you apply the distortion filter, the content in the top 25-30% of your image will be stretched out, and the bottom 25-30% will be pinched/squeezed, so just be aware that this will happen. You will want to play around with this feature with variations of image cropping to get a feel for what it will do to your images.
Step 8: Polish your image
At this point, you will now have a 360 spherical panorama, but you might not be 100% happy with the output. If you don’t like how the distortion was applied, go back and change cropping and try again. If you want to make the colors “pop”, try applying Camera RAW as a filter. You’ll also notice that the corners of the image are partially transparent and stretched badly… you can crop this area, retouch the area, or layer assets within a composition. This is really up to you as the creator of the composition. Whatever you do, take advantage of Photoshop - it has a LOT of features you can use to enhance your creativity.

To see the final output at a higher resolution, check it out on my Flickr account! Or check out my Flickr set to see other spherical panoramas.
Tools I used in this composition:
- Photoshop
- Lightroom
- Premiere Pro (for editing the time lapse video)
All of which are a part of Adobe Creative Cloud. If you’re not already, become a member today and unleash your creativity!