One of my favorite parts of Creative Cloud is that it gives you everything you need to be creative. Whether you are into photography, video, illustration, print design, web design, or just dabble in creativity, Creative Cloud has everything that you need. I’ve been doing a lot of photography lately. My main tools for retouching images are Photoshop and Lightroom - Photoshop for the heavy edits and re-composition, and Lightroom for retouching/color correcting and bulk edits.
Using either of these tools you can turn images that originally looked “blah” into “Awesome!” - hence my tag line “bringing out the awesome”.
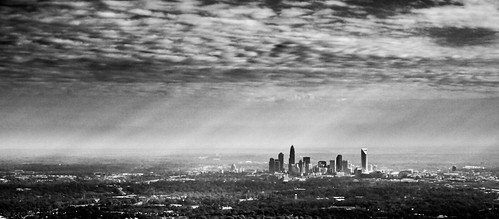
One great feature that I use in both of these tools is the ability to retouch colors using Adobe Camera RAW (In Photoshop CC this is a filter, in Lightroom this is under the “Develop” tab). This gives you the ability to enhance colors, enhance clarity, add effects, heal, and much more, and it is all relatively easy once you get the hang of it. Check out the images below for before and after shots of a photo I recently captured from a flight over Charlotte, NC.

Now, check out a time-lapse video showing the retouching process, to get an idea how this was done (more details below)…
That entire composition retouch only took a few minutes. Here’s what I used inside of Adobe Photoshop Lightroom to put it all together.
The “Basic” panel gives you the ability to quickly adjust color temperature, tint, exposure, contrast, highlight/shadows/white balance, and enhance clarity and color saturation as it applies to the entire image. Just drag the sliders to see the impact in real time.

The “Effects” panel gives you the ability to add a vignette effect to your images. You can adjust the sliders to increase vignette amount, midpoint size, roudness, feather, and more.

The “Detail” panel gives you the ability to sharpen or reduce noise in your images. In this case I used it to reduce luminance (brightness) noise on the image, but you can also apply noise reduction to colors.

The Graduated Filter and Adjustment Brush allow you easily apply localized adjustments to areas within your image. In this case, I applied two graduated filters: one to bring out contrast and definition in the sky, and another to darken and unsharpen the ground. Read more in the Lightroom documentation to learn how to use both the graduated filters and adjustment brush.

… and that’s all I did. I didn’t even use a big fancy camera to take this photo. I used a Panasonic Lumix LX7, which is a pretty good point and shoot camera, but it’s definitely not a DSLR.
If you want to see a bit more detail, check out a higher resolution variation over on my Flickr page.
Now, get out there and create amazing compositions and images. If you’re not already a member of Creative Cloud, join today at creative.adobe.com.