Multi-Screen iOS Apps with PhoneGap

Did you know that apps built on top of iOS can have a multi-screen workflow? For example in Keynote, you can have an external screen show a presentation while you control it on your iOS device. In the Jimi Hendrix app, you can view the audio player on an external screen, and in Real Racing HD, you can view the game on an external screen while the iOS device becomes your controller. (among others)

Real Racing HD

This is all made possible by the UIWindow and UIScreen APIs in iOS. Even better, on the iPad 2 and iPhone 4Gs, this can be done wirelessly using Airplay with an Apple TV device. On other iOS devices, you can have a second screen using a VGA output.

One of the benefits of using a cross platform solution like PhoneGap or Flex/Air is that you can build apps with an easier to use/more familiar paradigm.  However, cross platform runtimes don’t always offer access to every API feature that native development enables.

Out of the box, PhoneGap apps are confined to a single screen.  You can use screen mirroring to mirror content on an external screen, but you can’t have a second screen experience.  It’s a good thing you can write native plugins/extensions to enable native functionality within your applications.

ExternalScreen Native Plugin For PhoneGap

I recently did exactly that… I created a PhoneGap native plugin that enables second screen capability for PhoneGap applications.   The plugin listens for external screen connection notifications, and if an additional screen is available, it creates a new UIWebView for HTML-based content in the external screen – complete with functions for injecting HTML, JavaScript, or URL locations.

Why?

You might be wondering “Why?” you would want this plugin within PhoneGap…  this plugin enables the multi-screen experiences described in the apps mentioned above.  They extend the interactions and capabilities of the mobile hardware.   With this PhoneGap native plugin, you can create rich multi-screen experiences with the ease of HTML and JavaScript.   Here are a few ideas of the types of apps that you can build with this approach (scroll down for source code):

Fleet Manager

Let’s first consider a simple Fleet Manager application which allows you monitor vehicles in a mobile app.  This is a similar concept which I’ve used in previous examples.   The basic functionality allows you to see information on the tablet regarding your fleet.   What if this app connected to a larger screen and was able to display information about your vehicles for everyone to see?   Watch the video below to see this in real life.

This application example is powered by Google Maps, and all of the data is randomly generated on the client.

Law Enforcement

Let’s next consider a mobile law enforcement application application which gives you details to aid in investigations and apprehension of criminals.  Let’s pretend that you are a detective who is searching for a fugitive, and you walk into a crowded bar near the last known location of that fugitive.  You connect to the bar’s Apple TV on their big screen TV, pull up images and videos of the suspect, then say “Have you seen this person?”.   This could be incredibly powerful.  Check out the video below to see a prototype in real life.

This law enforcement demo scenario is a basic application powered by the FBI’s most wanted RSS data feeds.

Tip Of The Iceberg

There are lots of use cases where a second screen experience could be beneficial and create a superior product or application.   Using PhoneGap allows you to build those apps faster & with the ease of HTML and JavaScript, using traditional web development paradigms.

How It Works

Now, let’s review what makes this all work…   The client interfaces for both of these samples are written in HTML & JavaScript, and utilize jQuery, iScroll, and Modernizr, with a trick for removing link click delay on iOS devices.

The PhoneGap native plugin is written in Objective C, with a JavaScript interface to integrate with the client application. PhoneGap plugins are actually very easy to develop.  Basically, you have to write the native code class, write a corresponding JS interface, and add a mapping in your PhoneGap.plist file to expose the new functionality through PhoneGap.  There is a great reference on the PhoneGap wiki for native plugins which includes architecture & structure, as well as platform specific authoring and installation of those plugins.    Here are quick links to the iOS-specific native plugin content authoring and installation.

The ExternalScreen plugin creates a UIWebView for the the external screen, and exposes methods for interacting with the UIWebView.   Note: This is just a normal UIWebView, it does not have support for all PhoneGap libraries… just a standard HTML container.

You can read up on multi-screen programming at iOS from these useful tutorials:

Now let’s first examine the native code:

PGExternalScreen.h

The header file shows the method signatures for the native functionality.  The corresponding PGExternalScreen.m contains all of the actual code to make it all work.   Note: If you are using ARC (Automatic Reference Counting), you will need to remove the retain/release calls in PGExternalScreen.m.

[objc]
@interface PGExternalScreen : PGPlugin {

NSString* callbackID;
UIWindow* externalWindow;
UIScreen* externalScreen;
UIWebView* webView;
NSString* baseURLAddress;
NSURL* baseURL;
}

@property (nonatomic, copy) NSString* callbackID;

//Public Instance Methods (visible in phonegap API)
– (void) setupScreenConnectionNotificationHandlers:(NSMutableArray*)arguments withDict:(NSMutableDictionary*)options ;
– (void) loadHTMLResource:(NSMutableArray*)arguments withDict:(NSMutableDictionary*)options;
– (void) loadHTML:(NSMutableArray*)arguments withDict:(NSMutableDictionary*)options;
– (void) invokeJavaScript:(NSMutableArray*)arguments withDict:(NSMutableDictionary*)options;
– (void) checkExternalScreenAvailable:(NSMutableArray*)arguments withDict:(NSMutableDictionary*)options;

//Instance Methods
– (void) attemptSecondScreenView;
– (void) handleScreenConnectNotification:(NSNotification*)aNotification;
– (void) handleScreenDisconnectNotification:(NSNotification*)aNotification;
@end[/objc]

PGExternalScreen.js

The PGExternalScreen.js file defines the native methods that are exposed through PhoneGap.   You invoke the function, and can add success/fail callback function references.

[js]var PGExternalScreen = {

setupScreenConnectionNotificationHandlers: function (success, fail) {
return PhoneGap.exec(success, fail, “PGExternalScreen”, “setupScreenConnectionNotificationHandlers”, []);
},

loadHTMLResource: function (url, success, fail) {
return PhoneGap.exec(success, fail, “PGExternalScreen”, “loadHTMLResource”, [url]);
},

loadHTML: function (html, success, fail) {
return PhoneGap.exec(success, fail, “PGExternalScreen”, “loadHTML”, [html]);
},

invokeJavaScript: function (scriptString, success, fail) {
return PhoneGap.exec(success, fail, “PGExternalScreen”, “invokeJavaScript”, [scriptString]);
},

checkExternalScreenAvailable: function (success, fail) {
return PhoneGap.exec(success, fail, “PGExternalScreen”, “checkExternalScreenAvailable”, []);
}

};[/js]

The Client

You can call any of these functions from within your PhoneGap application’s JavaScript just by referencing the exposed method on the PGExternalScreen instance.

[js]// check if an external screen is available
PGExternalScreen.checkExternalScreenAvailable( resultHandler, errorHandler );

//load a local HTML resource
PGExternalScreen.loadHTMLResource( ‘secondary.html’, resultHandler, errorHandler );

//load a remote HTML resource (requires the URL to be white-listed in PhoneGap)
PGExternalScreen.loadHTMLResource( ‘http://www.tricedesigns.com’, resultHandler, errorHandler );

//load a HTML string
PGExternalScreen.loadHTML(‘

HTML

this is html content', resultHandler, errorHandler );

//invoke a JavaScript (passed as a string)
PGExternalScreen.invokeJavaScript('document.write(\'hello world\')', resultHandler, errorHandler );
[/js]

The full code for the ExternalScreen PhoneGap native plugin, as well as both client applications and a basic usage example is available on github at:

Be sure to read the README for additional setup information.

(Update: source code link changed)

Realtime Data & Your Applications

After spending some time playing around sketching with the HTML5 canvas element earlier this week, I figured “why not add some ‘enterprise’ concepts to this example?”…  Next thing you know we’ve got a multi-device shared sketching/collaboration experience.

To keep things straightforward, I chose to demonstrate the near-realtime collaboration using a short-interval HTTP poll.  HTTP polling is probably the simplest form of near-realtime data in web applications, however you may experience lag when compared to a socket connection of equivalent functionality.   I’ll discuss the various realtime data options you have in Flex/Flash and HTML/JS and their pros & cons further in this post.

What you’ll see in the video below is the sketching example with realtime collaboration added using short-interval data polling of a ColdFusion application server.  The realtime collaboration is shown between an iPad 2, a Kindle Fire, and a Macbook Pro.

Before we get into the code for this example, let’s first review some realtime data basics…

First, why/when would you need realtime data in your applications?  Here are just a few:

  • Time sensitive information, where any delay could have major repercussions
    • Realtime financial information
    • Emergency services (medical, fire, police)
    • Military/Intelligence scenarios
    • Business critical efficiency/performance metrics
  • Collaboration
    • Realtime audio/video collaboration
    • Shared experience (presentations/screen sharing)
  • Entertainment
    • Streaming media (audio/video)
    • Gaming

Regardless of whether you are building applications for mobile, the web, or desktop, using any technology (Flex/Flash, HTML/JS, Java, .NET, Objective C, or C/C++ (among others)), there are basically 3 methods for streaming/realtime data:

  • Socket Connection
  • HTTP Polling
  • HTTP Push

Socket Connections

Socket connectionss are basically end-to-end communications channels between two computer processes.   Your computer (a client) connects to a server socket and establishes a persistent connection that is used to pass data between the client and server in near-realtime.   Persistent socket connections are generally based upon TCP or UDP and enable asynchronus bidirectional communication.   Binary or Text-based messages can be sent in either direction at any point in time, in any sequence, as data is available.   In HTML/JS applications you can use web sockets, which I recently discussed, or use a plugin that handles realtime socket communication. Did you also know that the next version of ColdFusion will even have web socket support built in?  In Flash/Flex/AIR, this can be achieved using the RTMP protocol (LCDS, Flash Media Server, etc…) or raw sockets (TCP or UDP).

Direct Socket Communications

In general, direct socket based communication is the most efficient means of data transfer for realtime application scenarios.  There is less back and forth handshaking and less packet encapsulation required by various protocols (HTTP, etc…), and you are restricted by fewer network protocol rules.  However, socket based communications often run on non-standard or restricted ports, so they are more likely to be blocked by IT departments or stopped by network firewalls.    If you are using socket based communication within your applications, which are running on non-standard ports, and you don’t govern the network, you may want a fallback to another realtime data implementation for failover cases.

HTTP Polling

HTTP Polling is the process of using standard HTTP requests to periodically check for data updates on the server.  The client application requests information from the server.  Generally, the client will send a timestamp indicating the last data update time.  If there is information available on the server that is newer than the timestamp, that data will be immediately sent back to the client (and the client’s timestamp will be updated).   After a period of time, another request will be made, and so forth until the polling is stopped within the application.  Using this approach, the application is more-or-less “phoning home” periodically to the server to see if there are any updates.  You can achieve near-realtime performance by setting a very short polling interval (less than one second).

Basic Data Poll Sequence

HTTP polling uses standard web protocols and ports, and generally will not be blocked by firewalls.  You can poll on top of standard HTTP (port 80) or HTTPS (port 443) without any issue.  This can be achieved by polling JSON services, XML Services, AMF, or any other data format on top of a HTTP request.   HTTP polling will generally be slower than a direct socket method, and will also utilize more network bandwidth b/c of request/response encapsulation and the periodic requests to the server.  It is also important to keep in mind that the HTTP spec only allows for 2 concurrent connections to a server at any point in time.  Polling requests can consume HTTP connections, thus slowing load time for other portions of your application.   HTTP polling can be employed in HTML/JS, Flex/Flash/AIR, desktop, server, or basically any other type of application using common libraries & APIs.

HTTP Push

HTTP Push technologies fall into 2 general categories depending upon the server-side technology/implementation.  This can refer to HTTP Streaming, where a connection is opened between the client and server and kept open using keep-alives.   As data is ready to send to the client, it will be pushed across the existing open HTTP connection.   HTTP Push can also refer to HTTP Long Polling, where the client will periodically make a HTTP request to the server, and the server will “hold” the connection open until data is available to send to the client (or a timeout occurs).   Once that request has a complete response, another request is made to open another connection to wait for more data.  Once Again, with HTTP Long Poll there should be a very short polling interval to maintain near-realtime performance, however you can expect some lag.

HTTP Long Poll Sequence

HTTP Streaming & HTTP Long polling can be employed in HTML/JS applications using the Comet approach (supported by numerous backend server technologies) and can be employed in Flex/Flash/AIR using BlazeDS or LCDS.

Collaborative Applications

Now back to the collaborative sketching application shown in the video above… the application builds off of the sketching example from previous blog posts.   I added logic to monitor the input sketches and built a HTTP poll-based monitoring service to share content between sessions that share a common ID.

Realtime Collaborative Sketches

In the JavaScript code, I created an ApplicationController class that acts as an observer to the input from the Sketcher class.   The ApplicationController encapsulates all logic handling data polling and information sharing between sessions.   When the application loads, it sets up the polling sequence.

The polling sequence is setup so that a new request will be made to the server 250MS after receiving a response from the previous request.  Note: this is very different from using a 250MS interval using setInterval.  This approach guarantees 250MS from response to the next request.  If you use a 250MS interval using setInterval, then you are only waiting 250MS between each request, without waiting for a response.  If your request takes more than 250 MS, you will can end up have stacked, or “concurrent” requests, which can cause serious performance issues.

When observing the sketch input, the start and end positions and color for each line segment get pushed into a queue of captured transactions that will be pushed to the server.  (The code supports multiple colors, even though there is no method to support changing colors in the UI.)

[js]ApplicationController.prototype.observe = function(start, end, color) {
this.capturedTransactions.push( {"sx":start.x, "sy":start.y, "ex":end.x, "ey":end.y, "c":color} );
}[/js]

When a poll happens, the captured transactions are sent to the server (a ColdFusion CFC exposed in JSON format) as a HTTP post.

[js]ApplicationController.prototype.poll = function () {
this.pendingTransactions = this.capturedTransactions;
this.capturedTransactions = [];

var data = { "method":"synchronize",
"id":this.id,
"timestamp":this.lastTimeStamp,
"transactions": JSON.stringify(this.pendingTransactions),
"returnformat":"json" };

var url = "services/DataPollGateway.cfc";
$.ajax({
type: ‘POST’,
url: url,
data:data,
success: this.getRequestSuccessFunction(),
error: this.getRequestErrorFunction()
});
}[/js]

The server then stores the pending transactions in memory (I am not persisting these, they are in-ram on the server only).   The server checks the transactions that are already in memory against the last timestamp from the client, and it will return all transactions that have taken place since that timestamp.

[cf]<cffunction name="synchronize" access="public" returntype="struct">
<cfargument name="id" type="string" required="yes">
<cfargument name="timestamp" type="string" required="yes">
<cfargument name="transactions" type="string" required="yes">

<cfscript>

var newTransactions = deserializeJSON(transactions);

if( ! structkeyexists(this, "id#id#") ){
this[ "id#id#" ] = ArrayNew(1);
}

var existingTransactions = this[ "id#id#" ];
var serializeTransactions = ArrayNew(1);
var numberTimestamp = LSParseNumber( timestamp );

//check existing tranactions to return to client
for (i = 1; i lte ArrayLen(existingTransactions); i++) {
var item = existingTransactions[i];
if ( item.timestamp GT numberTimestamp ) {
ArrayAppend( serializeTransactions, item.content );
}
}

var newTimestamp = GetTickCount();

//add new transactions to server
for (i = 1; i lte ArrayLen(newTransactions); i++) {
var item = {};

if ( structkeyexists( newTransactions[i], "clear" )) {
serializeTransactions = ArrayNew(1);
existingTransactions = ArrayNew(1);
}

item.timestamp = newTimestamp;
item.content = newTransactions[i];
ArrayAppend( existingTransactions, item );
}

var result = {};
result.transactions = serializeTransactions;

result.timestamp = newTimestamp;
this[ "id#id#" ] = existingTransactions;;

</cfscript>

<cfreturn result>
</cffunction>[/cf]

When a poll request completes, any new transactions are processed and a new poll is requested.

[js]ApplicationController.prototype.getRequestSuccessFunction = function() {
<pre> var self = this;
return function( data, textStatus, jqXHR ) {

var result = eval( "["+data+"]" );
if ( result.length > 0 )
{
var transactions = result[0].TRANSACTIONS;
self.lastTimeStamp = parseInt( result[0].TIMESTAMP );
self.processTransactions( transactions );
}

self.pendingTransactions = [];
self.requestPoll();
}
}[/js]

You can access the full client and server application source on Github at:

I used ColdFusion in this example, however the server side could be written in any server-side language… Java, PHP, .NET, etc…

If you were building this application using web sockets, you could simply push the data across the socket connection without the need for queueing.

Sketching with HTML5 Canvas and “Brush Images”

In a previous post on capturing user signatures in mobile applications, I explored how you capture user input from mouse or touch events and visualize that in a HTML5 Canvas.  Inspired by activities with my daughter, I decided to take this signature capture component and make it a bit more fun & exciting.   My daughter and I often draw and sketch together… whether its a magnetic sketching toy, doodling on the iPad, or using a crayon and a placemat at a local pizza joint, there is always something to draw. (Note: I never said I was actually good at drawing.)

Olivia & the iPad

You can take that exact same signature capture example, make the canvas bigger, and then combine it with a tablet and a stylus, and you’ve got a decent sketching application.   However, after doodling a bit you will quickly notice that your sketches leave something to be desired.   When you are drawing on a canvas using moveTo(x,y) and lineTo(x,y), you are somewhat limited in what you can do. You have lines which can have consisten thickness, color, and opacity. You can adjust these, however in the end, they are only lines.

If you switch your approach away from moveTo and lineTo, then things can get interesting with a minimal amount of changes. You can use images to create “brushes” for drawing strokes in a HTML5 canvas element and add a lot of style and depth to your sketched content.  This is an approach that I’ve adapted to JavaScript from some OpenGL drawing applications that I’ve worked on in the past.  Take a look at the video below to get an idea what I mean.

Examining the sketches side by side, it is easy to see the difference that this makes.   The variances in stroke thickness, opacity & angle add depth and style, and provide the appearance of drawing with a magic marker.

Sketches Side By Side

It’s hard to see the subtleties in this image, so feel free to try out the apps on your own using an iPad or in a HTML5 Canvas-capable browser:

Just click/touch and drag in the gray rectangle area to start drawing.

Now, let’s examine how it all works.   Both approaches use basic drawing techniques within the HTML5 Canvas element.   If you aren’t familiar with the HTML5 Canvas, you can quickly get up to speed from the tutorials from Mozilla.

moveTo, lineTo

The first technique uses the canvas’s drawing context moveTo(x,y) and lineTo(x,y) to draw line segments that correspond to the mouse/touch coordinates.   Think of this as playing “connect the dots” and drawing a solid line between two points.

The code for this approach will look something like the following:

[js]var canvas = document.getElementById(‘canvas’);
var context = canvas.getContext(‘2d’);

context.beginPath();
context.moveTo(a.x, a.y);
context.lineTo(b.x, b.y);
context.lineTo(c.x, c.y);
context.closePath();
context.stroke();[/js]

The sample output will be a line from point A, to point B, to point C:

lineTo(x,y) Stroke Sample

Brush Images

The technique for using brush images is identical in concept to the previous example – you are drawing a line from point A to point B.  However, rather than using the built-in drawing APIs, you are programmatically repeating an image (the brush) from point A to point B.

First, take a look at the brush image shown below at 400% of the actual scale.  It is a simple image that is a diagonal shape that is thicker and more opaque on the left side.   By itself, this will just be a mark on the canvas.

Brush Image (400% scale)

When you repeat this image from point A to point B, you will get a “solid” line.  However the opacity and thickness will vary depending upon the angle of the stroke.   Take a look at the sample below (approximated, and zoomed).

Brush Stroke Sample (simulated)

The question is… how do you actually do this in JavaScript code?

First, create an Image instance to be used as the brush source.

[js]brush = new Image();
brush.src = ‘assets/brush2.png’;[/js]

Once the image is loaded, the image can be drawn into the canvas’ context using the drawImage() function. The trick here is that you will need to use some trigonometry to determine how to repeat the image. In this case, you can calculate the angle and distance from the start point to the end point. Then, repeat the image based on that distance and angle.

[js]var canvas = document.getElementById(‘canvas’);
var context = canvas.getContext(‘2d’);

var halfBrushW = brush.width/2;
var halfBrushH = brush.height/2;

var start = { x:0, y:0 };
var end = { x:200, y:200 };

var distance = parseInt( Trig.distanceBetween2Points( start, end ) );
var angle = Trig.angleBetween2Points( start, end );

var x,y;

for ( var z=0; (z<=distance || z==0); z++ ) {
x = start.x + (Math.sin(angle) * z) – halfBrushW;
y = start.y + (Math.cos(angle) * z) – halfBrushH;
context.drawImage(this.brush, x, y);
}[/js]

For the trigonometry functions, I have a simple utility class to calculate the distance between two points, and the angle between two points. This is all based upon the good old Pythagorean theorem.

[js]var Trig = {
distanceBetween2Points: function ( point1, point2 ) {

var dx = point2.x – point1.x;
var dy = point2.y – point1.y;
return Math.sqrt( Math.pow( dx, 2 ) + Math.pow( dy, 2 ) );
},

angleBetween2Points: function ( point1, point2 ) {

var dx = point2.x – point1.x;
var dy = point2.y – point1.y;
return Math.atan2( dx, dy );
}
}[/js]

The full source for both of these examples is available on github at:

This example uses the twitter bootstrap UI framework, jQuery, and Modernizr.  Both the lineTo.html and brush.html apps use the exact same code, which just uses a separate rendering function based upon the use case.    Feel free to try out the apps on your own using an iPad or in a HTML5 Canvas-capable browser:

Just click/touch and drag in the gray rectangle area to start drawing.

Stylistic Sketchy
Stylistic Sketchy - Click to Get Started

Flex Accepted by Apache Software Foundation

In case you did not see the post on the Flex Team blog on Dec. 31st, it was announced that Flex has officially been accepted by the Apache Software Foundation.   You can view the Apache Flex proposal on the Apache incubator wiki at http://wiki.apache.org/incubator/FlexProposal.

Apache Flex allows developers to target a variety of platforms, initially Apple iOS, Google Android, RIM BlackBerry, Microsoft Windows, and Mac OS X with a single codebase. Flex provides a compiler, skinnable user-interface components and managers to handle styling, skinning, layout, localization, animation, module-loading and user interaction management.

Just a bit of extra detail for you, all of which is available through Apache:

Initial goals of the Apache Flex incubation project:

  • Donate all Adobe Flex SDK source code and documentation to the Apache Software Foundation.
  • Setup and standardize the open governance of the Apache Flex project.
  • Rename all assets from Adobe Flex SDK to Apache Flex in project source code, docs, tests and related infrastructure.

Interesting App Store Statistics

Here are some interesting and quite surprising statistics for the US Census Browser HTML/PhoneGap showcase application that I released in December, which I wanted to share. The app is a browser for US Census data, full detail available here: http://www.tricedesigns.com/2010-census/. The Census Browser application was intended as a showcase app for enterprise-class data visualization in HTML-based applications, and all source code is freely available to the public.

What is really surprising is the “health” of my app within the given ecosystems. I offered the app as a free download in each market. The app is focused on Census data, so there is obviously not a ton of consumer demand, however the data is still interesting to play around with. I would not expect the same results for all types of apps in all markets.

Here are a few observations from the data:

  • Barnes & Noble Nook downloads far exceeded all other markets combined (69% of all downloads)
  • BlackBerry Playbook downloads were in 3rd, just behind iOS (BB is 11% of all downloads)
  • Android traffic was minimal (2% of all downloads)

The general public perception/assumption that I encounter is that the iOS market is strongest, followed by Android, and that BB is dead. These numbers show a conflicting reality. Barnes & Noble was the strongest, with iOS in second place, and BlackBerry just behind iOS.

Here is the full data for downloads in December:

Market Release Date # Downloads Link Notes
iOS 12/4/11 1151 link (iPad only)
Android (Google) 12/6/11 58 link (large-xlarge screens only)
Android (Amazon) 12/6/11 63 link (includes Kindle Fire)
BlackBerry 12/14/11 752 link (PlayBook only)
Barnes & Noble 12/20/11 4508 link (Nook)

Other Observations

Here are a few other observations from analyzing the download statistics for the various app markets…

Lots of people got Nook devices for Christmas this year:

BlackBerry Playbook downloads spiked from the BerryReview.com app review:

iOS traffic peaked just after the inital release with an increase after the winter holidays, but has been more-or-less consistent with no “spike”:

Amazon Market only had 8 downloads on Christmas day – this is likely the result of the fact that the Kindle Fire is branded as a consumer media device, not an analytics/computing device:

Know what else is interesting?   The charting/analytics for Amazon, Google, and Nook markets are all built with Adobe Flash, with both Amazon and Nook built using Adobe Flex.

Capturing User Signatures in Mobile Applications

One growing trend that I have seen in mobile & tablet applications is the creation of tools that enable your workforce to perform their job better. This can be in the case of mobile data retrieval, streamlined sales process with apps for door-to-door sales, mobile business process efficiency, etc…

One of the topics that comes up is how do you capture a signature and store it within your application? This might be for validation that the signer is who they say they are, or for legal/contractual reasons. Imagine a few scenarios:

  • Your cable TV can’t be installed until you sign the digital form on the installation tech’s tablet device
  • You agree to purchase a service from a sales person (door to door, or in-store kiosk) – your signature is required to make this legally binding.
  • Your signature is required to accept an agreement before confidential data is presented to you.

These are just a few random scenarios, I’m sure there are many more.   In this post, I will focus on 2 (yes, I said two) cross-platform solutions to handle this task – one built with Adobe Flex & AIR, and one built with HTML5 Canvas & PhoneGap.  

Source for both solutions is available at: https://github.com/triceam/Mobile-Signature-Capture

Watch the video below to see this in action, then we’ll dig into the code that makes it work.

The basic flow of the application is that you enter an email address, sign the interface, then click the green “check” button to submit to the signature to a ColdFusion server.  The server then sends a multi-part email to the email address that you provided, containing text elements as well as the signature that was just captured.

If you’d like to jump straight to specific code portions, use the links below:


The Server Solution

Let’s first examine the server component of the sample application.   The server side is powered by ColdFusion. There’s just a single CFC that is utilized by both the Flex/AIR and HTML/PhoneGap front-end applications.   The CFC exposes a single service that accepts two parameters: the email address, and a base-64 encoded string of the captured image data.

[cf]<cffunction name="submitSignature" access="remote" returntype="boolean">
<cfargument name="email" type="string" required="yes">
<cfargument name="signature" type="string" required="yes">

<cfmail SUBJECT ="Signature"
FROM="#noReplyAddress#"
TO="#email#"
username="#emailLoginUsername#"
password="#emailLoginPassword#"
server="#mailServer#"
type="HTML" >

<p>This completes the form transaction for <strong>#email#</strong>.</p>

<p>You may view your signature below:</p>
<p><img src="cid:signature" /></p>

<p>Thank you for your participation.</p>

<cfmailparam
file="signature"
content="#toBinary( signature )#"
contentid="signature"
disposition="inline" />

</cfmail>

<cfreturn true />
</cffunction>[/cf]

Note: I used base-64 encoded image data so that it can be a single server component for both user interfaces. In Flex/AIR you can also serialize the data as a binary byte array, however binary serialization isn’t quite as easy with HTML/JS… read on to learn more.


The Flex/AIR Solution

The main user interface for the Flex/AIR solution is a simple UI with some form elements. In that UI there is an instance of my SignatureCapture user interface component. This is a basic component that is built on top of UIComponent (the base class for all Flex visual components), which encapsulates all logic for capturing the user signature. The component captures input based on mouse events (single touch events are handled as mouse events in air). The mouse input is then used to manipulate the graphics content of the component using the drawing API. I like to think of the drawing API as a language around the childhood game “connect the dots”. In this case, you are just drawing lines from one point to another.

When the form is submitted, the graphical content is converted to a base-64 encoded string using the Flex ImageSnapshot class/API, before passing it to the server.

You can check out a browser-based Flex version of this in action at http://tricedesigns.com/portfolio/sigCaptureFlex/ – Just enter a valid email address and use your mouse to sign within the signature area. When this is submitted, it will send an email to you containing the signature.

You can check out the SignatureCapture component code below, or check out the full project at https://github.com/triceam/Mobile-Signature-Capture/tree/master/flex%20client. This class will also work in desktop AIR or browser/based Flex applications. The main application workflow and UI is contained with Main.mxml.

[as3]package
{
import flash.display.DisplayObject;
import flash.display.Graphics;
import flash.display.Sprite;
import flash.events.MouseEvent;
import flash.geom.Point;

import mx.core.UIComponent;
import mx.graphics.ImageSnapshot;
import mx.managers.IFocusManagerComponent;

import spark.primitives.Graphic;

public class SignatureCapture extends UIComponent
{
private var captureMask : Sprite;
private var drawSurface : UIComponent;
private var lastMousePosition : Point;

private var backgroundColor : int = 0xEEEEEE;
private var borderColor : int = 0x888888;
private var borderSize : int = 2;
private var cornerRadius :int = 25;
private var strokeColor : int = 0;
private var strokeSize : int = 2;

public function SignatureCapture()
{
lastMousePosition = new Point();
super();
}

override protected function createChildren():void
{
super.createChildren();

captureMask = new Sprite();
drawSurface = new UIComponent();
this.mask = captureMask;
addChild( drawSurface );
addChild( captureMask );

this.addEventListener( MouseEvent.MOUSE_DOWN, onMouseDown );
}

protected function onMouseDown( event : MouseEvent ) : void
{
lastMousePosition = globalToLocal( new Point( stage.mouseX, stage.mouseY ) );
stage.addEventListener( MouseEvent.MOUSE_MOVE, onMouseMove );
stage.addEventListener( MouseEvent.MOUSE_UP, onMouseUp );
}

protected function onMouseMove( event : MouseEvent ) : void
{
updateSegment();
}

protected function onMouseUp( event : MouseEvent ) : void
{
updateSegment();
stage.removeEventListener( MouseEvent.MOUSE_MOVE, onMouseMove );
stage.removeEventListener( MouseEvent.MOUSE_UP, onMouseUp );
}

protected function updateSegment() : void
{
var nextMousePosition : Point = globalToLocal( new Point( stage.mouseX, stage.mouseY ) );
renderSegment( lastMousePosition, nextMousePosition );
lastMousePosition = nextMousePosition;
}

public function clear() : void
{
drawSurface.graphics.clear();
}

override public function toString() : String
{
var snapshot : ImageSnapshot = ImageSnapshot.captureImage( drawSurface );
return ImageSnapshot.encodeImageAsBase64( snapshot );
}

override protected function updateDisplayList(w:Number, h:Number):void
{
super.updateDisplayList(w,h);

drawSurface.width = w;
drawSurface.height = h;

var g : Graphics = this.graphics;

//draw rectangle for mouse hit area
g.clear();
g.lineStyle( borderSize, borderColor, 1, true );
g.beginFill( backgroundColor, 1 );
g.drawRoundRect( 0,0,w,h, cornerRadius, cornerRadius );

//fill mask
g.clear();
g = captureMask.graphics;
g.beginFill( 0, 1 );
g.drawRoundRect( 0,0,w,h, cornerRadius, cornerRadius );
}

protected function renderSegment( from : Point, to : Point ) : void
{
var g : Graphics = drawSurface.graphics;
g.lineStyle( strokeSize, strokeColor, 1 );
g.moveTo( from.x, from.y );
g.lineTo( to.x, to.y );
}
}
}[/as3]


The HTML5/PhoneGap Solution

The main user interface for the HTML5/PhoneGap solution is also a simple UI with some form elements. In that UI there is a Canvas element that is used to render the signature. I created a SignatureCapture JavaScript class that encapsulates all logic for capturing the user signature. In browsers that support touch events (mobile browsers), this is based on the touchstart, touchmove and touchend events. In browsers that don’t support touch (aka desktop browsers), the signature input is based on mousedown, mousemove and mouseup events. The component captures input based on touch or mouse events, and that input is used to manipulate the graphics content of the Canvas tag instance. The canvas tag also supports a drawing API that is similar to the ActionScript drawing API. To read up on Canvas programmatic drawing basics, check out the tutorials at http://www.adobe.com/devnet/html5/html5-canvas.html

When the form is submitted, the graphical content is converted to a base-64 encoded string using the Canvas’s toDataURL() method. The toDataURL() method returns a base-64 encoded string value of the image content, prefixed with “data:image/png,”. Since I’ll be passing this back to the server, I don’t need this prefix, so it is stripped, then sent to the server for content within the email.

You can check out a browser-based version of this using the HTML5 Canvas in action at http://tricedesigns.com/portfolio/sigCapture/ – Again, just enter a valid email address and use your mouse to sign within the signature area. When this is submitted, it will send an email to you containing the signature. However, this example requires that your browser supports the HTML5 Canvas tag.

You can check out the SignatureCapture code below, or check out the full project at https://github.com/triceam/Mobile-Signature-Capture/tree/master/html%20client. This class will also work in desktop browser applications that support the HTML5 canvas. I used Modernizr to determine whether touch events are supported within the client container (PhoneGap or desktop browser). The main application workflow is within application.js.

Also a note for Android users, the Canvas toDataURL() method does not work in Android versions earlier than 3.0. However, you can implement your own toDataURL() method for use in older OS versions using the technique in this link: http://jimdoescode.blogspot.com/2011/11/trials-and-tribulations-with-html5.html (I did not update this example to support older Android OS versions.)

[js]function SignatureCapture( canvasID ) {
this.touchSupported = Modernizr.touch;
this.canvasID = canvasID;
this.canvas = $("#"+canvasID);
this.context = this.canvas.get(0).getContext("2d");
this.context.strokeStyle = "#000000";
this.context.lineWidth = 1;
this.lastMousePoint = {x:0, y:0};

this.canvas[0].width = this.canvas.parent().innerWidth();

if (this.touchSupported) {
this.mouseDownEvent = "touchstart";
this.mouseMoveEvent = "touchmove";
this.mouseUpEvent = "touchend";
}
else {
this.mouseDownEvent = "mousedown";
this.mouseMoveEvent = "mousemove";
this.mouseUpEvent = "mouseup";
}

this.canvas.bind( this.mouseDownEvent, this.onCanvasMouseDown() );
}

SignatureCapture.prototype.onCanvasMouseDown = function () {
var self = this;
return function(event) {
self.mouseMoveHandler = self.onCanvasMouseMove()
self.mouseUpHandler = self.onCanvasMouseUp()

$(document).bind( self.mouseMoveEvent, self.mouseMoveHandler );
$(document).bind( self.mouseUpEvent, self.mouseUpHandler );

self.updateMousePosition( event );
self.updateCanvas( event );
}
}

SignatureCapture.prototype.onCanvasMouseMove = function () {
var self = this;
return function(event) {

self.updateCanvas( event );
event.preventDefault();
return false;
}
}

SignatureCapture.prototype.onCanvasMouseUp = function (event) {
var self = this;
return function(event) {

$(document).unbind( self.mouseMoveEvent, self.mouseMoveHandler );
$(document).unbind( self.mouseUpEvent, self.mouseUpHandler );

self.mouseMoveHandler = null;
self.mouseUpHandler = null;
}
}

SignatureCapture.prototype.updateMousePosition = function (event) {
var target;
if (this.touchSupported) {
target = event.originalEvent.touches[0]
}
else {
target = event;
}

var offset = this.canvas.offset();
this.lastMousePoint.x = target.pageX – offset.left;
this.lastMousePoint.y = target.pageY – offset.top;

}

SignatureCapture.prototype.updateCanvas = function (event) {

this.context.beginPath();
this.context.moveTo( this.lastMousePoint.x, this.lastMousePoint.y );
this.updateMousePosition( event );
this.context.lineTo( this.lastMousePoint.x, this.lastMousePoint.y );
this.context.stroke();
}

SignatureCapture.prototype.toString = function () {

var dataString = this.canvas.get(0).toDataURL("image/png");
var index = dataString.indexOf( "," )+1;
dataString = dataString.substring( index );

return dataString;
}

SignatureCapture.prototype.clear = function () {

var c = this.canvas[0];
this.context.clearRect( 0, 0, c.width, c.height );
}[/js]


Source for the ColdFusion server, as well as Flex/AIR and HTML5/PhoneGap clients is available at: https://github.com/triceam/Mobile-Signature-Capture

Toying with Realtime Data & Web Sockets

Recently I was acting as a “second set of eyes” to help out fellow Adobe Evangelist Kevin Hoyt track down a quirk with a websockets example that he was putting together. Kevin has a great writeup to familiarize yourself with web sockets & streaming communication that I highly recommend checking out.

While working with Kevin’s code, I started tinkering… “what if I change this, what if I tweak that?” Next thing you know, I put together a sample scenario showing subscription-based realtime data streaming to multiple web clients using web sockets. Check out the video below to see it in action.

You are seeing 9 separate browser instances getting realtime push-based updates from a local server using web sockets. When the browser loads, the html-based client makes a web socket connection, then requests all symbols from the server. The server then sends the stock symbol definitions back to the client and displays them within the HTML user interface. From there, the user can click on a stock symbol to subscribe to updates for that particular symbol. DISCLAIMER: All that data is randomly generated!

I put together this example for experimentation, but also to highlight a few technical scenarios for HTML-based applications. Specifically:

  • Realtime/push data in HTML-based apps
  • Per-client subscriptions for realtime data
  • Multi-series realtime data visualization in HTML-based apps

The server is an AIR app started by Kevin, based on the web sockets draft protocol. It is written in JavaScript, and the client is a HTML page to be viewed in the browser.

If you don’t feel like reading the full web sockets protocol reference, you can get a great overview from websocket.org or Wikipedia.

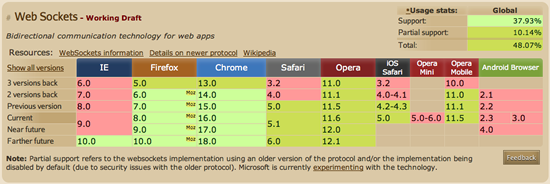
One thing to keep in mind is that web sockets are not widely supported in all browsers yet. There is a great reference matrix for web socket support from caniuse.com:

If you still aren’t sure if your browser supports web sockets, you can also check simply by visiting websocketstest.com/. If you want to test for web socket support within your own applications, you can easily check for support using Modernizr. Note: I didn’t add the Modernizr test in this example… I only tested in Chrome on OSX.

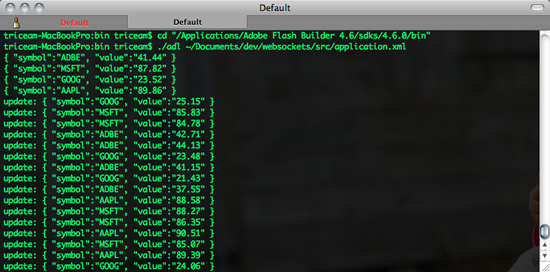
OK, now back to the sample application. All of the source code for this example is available on github at: https://github.com/triceam/Websocket-Streaming-Example.  To run it yourself, you first have to launch the server. You can do this on the command line by invoking ADL (part of the AIR SDK):

[as3]cd "/Applications/Adobe Flash Builder 4.6/sdks/4.6.0/bin"
./adl ~/Documents/dev/Websocket-Streaming-Example/server/application.xml[/as3]

You’ll know the server is started b/c an air window will popup (you can ignore this, just don’t close it), and you will start seeing feed updates in the console output.

Once the server is running, open “client/client.html” in your browser. It will connect to the local server, and then request the list of symbols. If you click on a symbol, it will subscribe to that feed. Just click on the symbol name again to unsubscribe. You’ll know the feed is subscribed b/c the symbol will show up in a color (matching the corresponding feed on the chart). Again, let me reiterate that I only tested this in Chrome.

You can open up numerous client instances, and all will receive the same updates in real time for each subscribed stock symbol.

The “meat” of code for the server starts in server/scripts/server/server.js. Basically, the server loads a configuration file for the socket server, then creates a ConnectionManager and DataFeed (both of these are custom JS classes). The ConnectionManager class encapsulates all logic around socket connections. This includes managing the ServerSocket as well as all client socket instances and events. The DataFeed class handles data within the app. First, it generates random data, then sets up an interval to generate random data updates. For every data update, the ConnectionManager instance’s dispatch() method is invoked to send updates to all subscribed clients. Rather than trying to put lots of code snippets inline in this post (which would just be more confusing), check out the full source at: https://github.com/triceam/Websocket-Streaming-Example/tree/master/server

The client code all starts in client.html, with the application logic inside of client/scripts/client.js. Once the client interface loads, it connects to the web socket and adds the appropriate event handlers. Once subscribed to a data feed, realtime data will be returned via the web socket instance, transformed slightly to fit the data visualization structure, then rendered in an HTML canvas using the RGraph data visualization library. RGraph is free to get started with, however if you want to deploy a production app with it, you’ll need a license. You’ll notice that each feed updates independently, based upon the client subscriptions. Note: The data visualization is not temporally aligned… if you want the updates in time-sequence, there is a litte bit more work involved in the client-side data transformation.

Again, rather than trying to put lots of confusing code snippets inline in this post, check out the full client side source at: https://github.com/triceam/Websocket-Streaming-Example/tree/master/client

This example is intended to get your minds rolling with the concepts; it is not *yet* an all-encompassing enterprise solution. You can expect to see a few more data push scenarios here in the near future, based on different enterprise server technologies.

Enjoy!

Introducing the US Census Browser Application

I’d like to take this opportunity to introduce you to a new project I’ve been working on to showcase enterprise-class data visualization in HTML-based applications.   The US Census Browser is an open source application for browsing data from the 2010 US Census.

The app is completely written using HTML and JavaScript, even for the charting/data visualization components. You can check it out in several application ecosystems today:

Apple iTunes: http://itunes.apple.com/us/app/census-browser/id483201717
Google Android: https://market.android.com/details?id=com.tricedesigns.CensusBrowser
BlackBerry App World: http://appworld.blackberry.com/webstore/content/69236?lang=en
Amazon App Store: http://www.amazon.com/Andrew-Trice-US-Census-Browser/dp/B006JDATOY/ref=sr_1_1?ie=UTF8&s=mobile-apps&qid=1323874245&sr=1-1 (this includes support for Kindle Fire)

Support for additional platforms is planned for future development. Future targets include BlackBerry Playbook as well as Android 2.x devices, including the Amazon Kindle Fire and Barnes & Noble Nook Color – Android 2.x does not support SVG graphics in-browser, so I am working on some alternative features.

Update: Kindle Fire and Playbook have been approved, and are now supported. See links above.

You can also view the US Census Browser application in your desktop or mobile browser at: http://tricedesigns.com/census/

Please keep in mind that this application was designed for mobile devices.  Internet Explorer in particular does not work well with the Census Browser – use at your own risk.   The browser-based application has been tested and works properly in the latest versions of Chrome, Safari, Firefox, and Opera.   The US Census Browser application also does not work in Android 2.x and below, due to the fact that these versions of Android do not support SVG graphics in the mobile browser.

Full application source code for the HTML/JS interface and ColdFusion backend system are available at https://github.com/triceam/US-Census-Browser under the terms of the “Modified BSD License”. Be sure to review the README if you want to get this running on your own.

APPLICATION OVERVIEW
The application is essentially a single-page web site, which asynchronously loads data from the backend upon request, and displays that data to the user. The main application file is index.html, which loads the UI and appropriate client-side scripts. The main presentation logic is applied via CSS stylesheets, and the application control is handled by the ApplicationController class, inside of application.js. The ApplicationController class handles state changes within the application and updates the UI accordingly. The main data visualization and data formatting logic is all contained within the censusVisualizer class, which the ApplicationController class uses to render content. All DOM manipulation, event handling, and AJAX requests are performed using jQuery.

The data visualization is implemented 100% client-side, using the Highcharts JavaScript library. Highcharts renders vector graphics client-side, based upon the data that is passed into it. Check out the examples at: http://www.highcharts.com/demo/ for a sample of what it is capable of.

The fluid scrolling and swiping between views is implemented using the iScroll JavaScript library. Note: I’m using iScroll-lite.js. This is a great resource for any HTML-mobile, or mobile-web applications.

PHONEGAP USAGE
The client-side runtime does not have any dependencies for access to device-specific functionality. However, PhoneGap is being used as an application container so that the application can be distributed through various mobile “app stores”.

SERVER-SIDE
The back-end of this application is written using ColdFusion. Yep, that’s right. I used CF. In fact, the server side is ridiculously simple. It is only a single ColdFusion Component (CFC), with three remotely exposed methods for accessing data, and relies upon CF’s built in functionality to serialize JSON. CF is incredibly powerful, and made this project very simple and quick to develop.

Feel free to check it out on github: https://github.com/triceam/US-Census-Browser
You can also check out more technical details at: http://www.tricedesigns.com/2010-census/

Preview: New HTML5/PhoneGap Project

Here’s a quick preview of my new HTML5/PhoneGap data vizualization app. Once released, this will be available on multiple platforms, in multiple app stores, AND it will be completely open source.  Just waiting on app store approvals…

You can expect a full writeup on how this was built after it is released.

Enjoy!


UPDATE:

This application is now available in iOS and Android markets, and full source code is available. See details at http://www.tricedesigns.com/2011/12/05/introducing-the-us-census-browser-application/

Flex 4.6 is Available AND I’m on TV!

(Adobe TV, that is)

In case you had not seen on the Flex team blog, twitter or through some other medium, Flex SDK 4.6 and Flash Builder 4.6 were released today!  Go get them, if you have not done so already.  Flex 4.6 marks a huge advancement for the Flex SDK, especially regarding mobile applications.

Flash Builder 4.6 is a FREE update for Flash Builder 4.5 users. From the Flex team blog:

A lot is included in this update, so much so that we couldn’t deliver it in the Adobe Application Manager. This means Flash Builder 4.5 users won’t automatically be notified about the update and will have to download the full Flash Builder 4.6 installer and enter their Flash Builder 4.5 serial number.

You can download the open source Flex SDK at: http://opensource.adobe.com/wiki/display/flexsdk/Download+Flex+4.6.

Or, you can download Flash Builder 4.6 from: https://www.adobe.com/cfusion/tdrc/index.cfm?product=flash_builder.  Flash Builder 4.6 release notes are available at http://kb2.adobe.com/cps/921/cpsid_92180.html

Note: you must uninstall Flash Builder 4.5.1 to install Flash Builder 4.6.  

You can read specifics about what’s new in Flash Builder 4.6 on the Adobe Developer Connection at: http://www.adobe.com/devnet/flash-builder/articles/whatsnew-flashbuilder-46.html, and what’s new in Flex SDK 4.6 at: http://www.adobe.com/devnet/flex/articles/introducing-flex46sdk.html

Coinciding with the Flex & Flash Builder releases, new content around Flex and Flash Builder 4.6 have been posted on Adobe TV.   There is a bunch of great new content worth checking out, including fellow evangelist Michael Chaize’s adaptive UI for different platforms and device form factors.   In addition, here I am speaking out the new Captive Runtime feature introduced in AIR 3…

Captive Runtime for Mobile

Captive Runtime for Desktop